Congratulate the Success of Russia Exhibition
DIY Desktop Laser Cutter and Engraver - FABOOL Laser Mini
by:QUESTT
2020-04-21
The summary Fabool laser Mini is an opensource, ready-to-
Assemble the desktop laser cutting machine and carving knife developed by Japanese engineer smartDIYs.
The machine is excellent in terms of availability and scalability to meet a variety of needs.
It\'s all from the development of a high
A year and a half ago we powered our own 60 w large laser cutter and engraver and we turned it into a smaller version of the desktop laser cutter and engraver, like the smart laser mini
This time, we released the upgraded version of the FABOOL Mini, which has improved its usability, fashion design and 1/4 assembly time.
In June 2016, FABOOL laser Mini earned about $60 million, the highest amount in the history of Japan\'s major crowdfunding platforms and the world\'s second-highest laser cutting campaign.
For more information about our laser cutting machines and carving knives-
FABOOL laser MiniKey features 1.
The \"scalability\" extension section that adapts to the various needs of users allows users to customize according to their own needs. (e. g.
Will cause the frame of 1 m * 1 m processing range to expand and replace it with a laser head that can produce a higher output.
Because both hardware and software are open source, the user\'s original functionality can be added. 2.
Meet a wide range of needs by providing adequate machine performance
Motor driver and high
Fast microcomputer chips, FABOOL laser Mini can be used in a variety of situations from design, teaching to prototyping!
Although the price is affordable, but high
Specifications and quality in Japan
The design of the laser cutting machine will not disappoint the user. 3.
Easy assembly takes only two hours.
All you need is a hex wrench and wrench included in the FABOOL laser mini kit. 4.
User friendly cloud
All free softwarein-
A software is cloud.
Browser-based and working on a browser, including functions such as creating and retrieving processed data for a product
Share all the data and images of the product between other users.
Product Specification Working Area: 300 × 230mm laser: 1.
445nm 6 w laser diode (Basic Model)/ 3. 5W (Power-up Model)
Processing Method: Vector engraving supports Raster engraving of Windows 7 and Windows 8 operating systems.
1. windows 10, Mac OS X, Linux, browser supporting Raspberry Pi: files supported by Chrome and FireFox: USB cable, AC adapter, laser safety glasses, hex wrench, wrench power supply: AC100V ~ 240 V size 540x485x140mm (
Cable not included)
Working temperature: below 30C (86F)
Continuous working hours: about 4 kg weight under 1 hour
Y axis x1 motor mounting plate
X-X shaft x2 timing pulley 3x m3x6 hex socket head cap bolt x12 Assembly
Shaft motor unit motor mounting plate X-
Shaft mounting motor mounting plate x-
Shaft on stepping motor, with m3 × 6 hexagon plug Bolt.
* X direction of motor mounting plate-
Shaft, make sure there are two small holes in the lower right corner.
Install the timing pulse on the spindle of the stepping motor to insert the timing pulley, and then tighten the 2 fixing screws with a hex wrench.
* Make sure the timing pulley is in the right direction.
* Insert the fixing screw into the timing pulley from the beginning.
If it is not possible to insert the timing pulley smoothly, Release 2 groups-
Screw the screw with a hex wrench and try to insert it again.
* Please be careful because they are easy to fall off when the fixing screws are too loose.
Insert the timing pulley completely into the spindle. (
The position adjustment will be done later, so there is no need for precise alignment at this time. )Assembly of X-
Shaft motor unit completed. Assembly of Y-
Shaft motor unit for mounting motor mounting plate Y
Shaft mounting motor mounting plate y-
Insert the shaft into the stepping motor using the m3 × 6 hex screw socket Bolt.
Install timing PulleyAs with x-
Shaft, insert the timing pulley into the spindle of the stepping motor and tighten the screws.
Make sure that the timing pulley is fully inserted into the spindle. (
The position adjustment will be done later, so there is no need for precise alignment at this time. )
Assemble the other in the same program, but make sure the direction of the motor mounting plate y-The axis is correct. Assembly of y-
Shaft motor unit completed.
For more detailed instructions with pictures, click parts list \". Mini v platform _ c x1mini v platform _ l x1mini v platform _ r x1x-
X1V-shaft motor unit
Slot 450mm x1Optical stage x1M5 x1M4 * monthly hex bolt T nut x6M5 * month low head bolt x6Cable tie x2M6 * monthly hex bolt x2Timing belt 106 cm x1Assembly X
Before assembly, we will perform shaft adjustment and inspection on three types of micro v plates.
Please check if all 10 screws are firmly fixed.
If the screws are loose, tighten with a hex wrench and wrench.
Next, adjust the space between the wheels of the three micro v plates.
Use one wheel for adjustment on each Mini v board.
The first is mini v plate_C. Insert the V-
Slot 450mm between Mini v plate_C rollers.
It may be too loose or too tight.
The correct state is \"no significant clicking sound when v-
Straight up slot.
The structure and adjustment of the eccentric wheel (
One on each Mini v Board)
Contains eccentric gasket.
It can be adjusted by turning the eccentric gasket.
The position of the wheel (
Space between wheels)
Adjust by turning the gasket.
Gradually turn the eccentric gasket with a wrench, while sliding the Micro v plate to adjust the looseness and tightness.
Adjust until there is no significant click when v-
Straight up slot.
Once the adjustment of the Micro v board is completed, slide out V-slot 450mm.
Next, adjust the mini v plate_R and mini v plate_L in the same way as above. Use V-
Slot 450mm that you use to adjust.
Once the adjustment of Micro v plate _ r and micro v plate _ l is completed, from v-slot 450mm.
This is the adjustment and inspection of 3 Micro v plates.
Install Mini v platform in V-
Slot 450mm between Mini v plate_C rollers.
Install the mini v platform _ rnext-
Slot 450mm on the table, then install the Mini v platform _ r on the left side of V-
Slot 450mm with M5 T nut and 5x8 bow Bolt.
Put two M5 T nuts in V-
450mm slot from left end.
* The position does not have to be precise at this point.
Install the Micro v platform _ r with two of the M5 × 8 bow bolts, and the M5 T nut is in it.
Position the Mini v platform _ r with \"V-
The slot is perfect for the grooves on the back of the Mini v plate_R.
\"Install Mini v platform _ linstall Mini v platform _ l on the right side of V slot using M5 T nut and 5 × 8 bow Bolt.
In the same way as before, put two M5 T nuts into the V slot from the right side.
Install the Micro v platform _ l with two of the M5 × 8 bow bolts, located in the position where the M5 T nut is located.
In the same way as before, compare the position of mini v plate_R with \"V-
The slot is perfect for the grooves on the back of the Mini v plate_R. ”Installing x-
Installation of x-axis motor unit
The shaft motor unit you assembled in the early part on the Mini v platform l with M5 T nut and 5x8 hex socket head cap bolts.
We will adjust the position of x-
After the shaft motor unit.
Again, place two of the M5 T nuts in the position shown in the following figure and install x-
Shaft motor unit with m5 × 8 bow Bolt.
For the later process, tighten x-
The shaft motor unit on the position where the stepping motor spindle and mini v plate_L just met.
Install the timing belt and install the timing belt. Place x-
In order to easily install the timing belt, prepare the timing belt 106 cm and cable tie the shaft motor unit to the left.
Use the thinnest hex wrench.
Insert the end of the timing belt into the hole on the left side of the mini v plate_C.
Insert the jagged surface of the timing belt up until 2-
It\'s 3 cm in the groove.
Fold the timing belt with a jagged surface.
Fix the timing belt using cable tie belt.
Place the bound part at the bottom.
* If the situation is not good, please cut the tie and try again with the new one. (
There are 10 more ties. )
Once one end of the timing belt is fixed, insert the other end into the hole on the right side of the Mini v platform c around x-
Shaft motor unit and timing pulley on the other side.
* Please make sure the timing belt is not twisted.
In the same way as before, fix the timing belt using cable tie belt.
* The rough length of the timing belt to leave is 2-3cm.
We\'ll adjust it later so you don\'t have to be too precise.
Cut off the rest of the two ties.
At this point it is OK to keep the timing belt a little loose.
Please make sure the timing pulley is on the x-
Axis motor is aligned with the track slot on V-slot.
If there is a gap, Please loosen the fixing screw on the timing pulley, adjust the position and tighten the screw again.
Next, release the fixed \"x-\" in order to extend the timing belt-
Shaft motor unit \", pull the timing belt and tighten the screw again.
Please make sure the motor and V-
Adjust the timing belt parallel slot.
Install the optical stage and install the optical stage on mini v plate_C with 6 × 8 Hex plug cap bolts.
Screws m4 × 6 hex socket head cap bolts and x-at the top of the optical stage-
Complete shaft assembly.
For more detailed instructions on the picture, click hereList-for PartsX-axis unit x1V-slot 410mm x4Y-
Shaft motor x2 idler wheel plate x2 timing belt 100 cm x2 m5 T nut x18Bracket x 4M5*8 bow Bolt x16 Cable tie-in x4 Y-assembly
Axis assembly of the frame-three sides of the Assembly frame
Slot 410mm, bracket, M5 T nut x4 and M5 * 8 bow Bolt x4.
On a flat table, put three V-slot 410mm.
Put one M5 T nut in each of the four holes around the corner.
Place the bracket on the two corners where you place the M5 T nut and temporarily fix it with a 5x8 Bolt. Stand up the V-
Slot and make sure it is at right angle.
Then remove the gap between V-
Push the slot with your hand and tighten the 5x8 bow Bolt.
Repeat the same procedure on the other side to complete the assembly of the frame.
* Please make sure the m5 × 8 bow Bolt is tightened so that the frame does not deform when lifting.
Place the frame on the table and slide \"x-
Axis unit \", you are in V-slot frame. (Insert the V-
There is a slot between the rollers. )
Next, assemble the last side of the frame using the following parts.
First, insert two M5 T nuts in the hole outside. (
We will use these in future components to install the board housing. )
Second, as with the front, insert four M5 T nuts in each hole and put them into the frame.
Place the bracket on two corners and place the M5 T nut.
* Please make sure the m5 × 8 bow Bolt is tightened so that the frame does not deform when lifting.
* Adjust when placing all four sides of the frame on the table, making it easier to maintain the frame horizontally and at right angles. Checking Y-
Axis => adjust V-
Check the movement of y-With the hand shaft.
The correct state is x-
When the frame stands up, slide under the axial direction. *Move x-
Axis as much as possible.
If you feel slightly stuck, loosen the eccentric gasket of the Mini v platform r and the Mini v platform l. (
Watch the video below)
From the side of the wheel you can easily see the wheel and V-
Groove of the slot, so it is easier to adjust.
X-loose
The shaft unit does not affect the operation. Installing Y-
Shaft motor unit/Idler wheel platform placement x-
Shaft motor closer to you
Install shaft motor unit on the left \"and idler wheel board on the right.
Insert two M5 T nuts from the right side and mount the idler wheel plate with a 5 × 8 bow Bolt.
We will make final adjustments later in the conference.
Next, insert two M5 T nuts from the left side and install \"y-
Shaft motor unit with m5 × 8 \".
Make adjustments to align the \"black line\" of \"y\"
Shaft motor unit at the edge of the aluminum frame \".
There is another \"black line\" inside, so make sure V-
The slot fits perfectly.
Make sure the timing pulley position matches the groove of V-slot.
If it is not aligned, loosen the fixing screw for the timing pulley, adjust the position, and tighten the fixing screw again.
The leg installation on this side is complete.
Repeat the same process and install a leg on the other side.
Make sure the timing pulley position matches the groove of V-slot.
If it is not aligned, loosen the fixing screw for the timing pulley, adjust the position, and tighten the fixing screw again.
The second round of installation is now completed.
Install you in the previous section for x-
Shaft, install timing belt using cable tie belt. (
In the picture, we put \"x-
Shaft motor unit closer to us. )
Insert the timing belt from the top and insert the jagged surface inside.
Tighten the cable tie in the direction shown in the figure.
Once one side of the timing belt is fixed, turn the timing pulley and fix the other side with a cable tie.
When fixed with cable tie, try to tighten the belt. (
Please note that there is a limit on the tightness of the belt, allowing normal operation, so you don\'t need to pull too tight.
We will adjust the tightness later. )
The timing belt should be a bit loose at this time.
To tighten the belt, loosen the screw on the side of the idler wheel and tighten the screw again while pulling the belt in the direction shown in the figure.
You finish this side when the timing belt is tight.
Again, on the other side, after the timing belt is installed, pull the idler wheel to tighten the belt.
You\'re done with this.
Click here for more details, including a list of pictures of PartsPCB case x1Laser board (1. 6W/3. 5W)
X1Control board x1M5 * 6 bow Bolt x 2 M3 * 4 hex socket head cap bolt x9assier x8 Cable tie-in to capture x1 board installation * instructions on 3,
5 installation of laser board (For 1. 6W)
Insert the gasket between the gasket already attached to the PCB housing and the laser plate and tighten it with the m3 × 4 hex plug cover Bolt (four points).
Install the PCB housing on the body and place the PCB housing on V-
Slot 410mm on the back of the fuselage.
Fix it using two of the M5 t nut and two of the 5 × 6 bow bolts (
Inserted when assembling frame).
Aim at the center of the installation location.
Install the gasket between the control board and the m3 × 4 hex plug Bolt and tighten it (four points).
Adjust the tilt of the radiator to install the DC fan and tilt the 5mm two radiators on the laser board.
If it tilts too much, it touches the side cover.
Make sure it does not touch the side cover.
5mm is the state of horizontal from the plate and radiator.
Clip the cable tie belt behind the red circle and fix the cable tie belt with a hex plug cover Bolt.
Installation of plates (3. 5W)
If you use 1.
6 w model, please skip this part.
Insert the gasket between the gasket already attached to the PCB housing and the laser plate and tighten it with the m3 × 4 hex plug cover Bolt (four points).
Install the PCB housing on the body and place the PCB housing on V-
Slot 410mm on the back of the fuselage.
Fix it using two of the m5 × 6 bow bolts (
Inserted when assembling frame).
Aim at the center of the installation location.
Install a washer between the control board and the m3 × 4 hex plug Bolt and tighten it (four points).
Put a cable tie at the back of the Red Circle (see picture)
, Fixed cable tie with Hex plug cover Bolt.
See the picture for the direction of the capture.
Click here for more details, including a list of pictures of PartsPCB chassis x1Laser cable x1X-axis-R cable x1X-axis cable x1Y-axis-
L laser board x1Foot switch cable x1Cable cable with x2 wiring (for 1. 6W)
※Description of 3.
5 w, please check below the page.
We will do the wiring of 6 cables. 1. PCB cable2. Laser Cable3. X-axis cable4. Y-axis-R cable5. Y-axis-L cable6.
Foot switch cable wiring inside the PCB chassis we will collect cables with two cable ties. Wiring for 1. 6W is done.
* The picture shown here is 1.
Monthly WWiring laser board (for 3. 5 W)
Wiring six steps 1. PCB cable2. Laser cable3. X-axis cable4. Y-axis-R cable5. Y-axis-L cable6.
Foot switches inside the PCB chassis collect cables we will collect cables with two cable ties. Wiring for 3. 5W is done.
Click here to learn more about the PartsM3 post picture list
Assembly nut x 2 M3 * 6 hex socket head cap bolt x2 cable tie belt capture x2 cable tie belt x8 fixed cable tie belt capture the body of FABOOL laser Mini.
The side facing you will be the base.
After sliding M3
Assemble the nut into a V-slotslot.
Put it completely in the groove.
Fix the cable tie buckle with m3 × 6 hex plug Bolt.
Determine its orientation.
Fix the opposite side in the same direction.
After sliding M3
Assemble the nut into a V-slotslot.
Fix the cable tie buckle with m3 × 6 hex plug Bolt.
Determine its orientation.
Fix the opposite side in the same direction.
The wiring of the laser cable fixes one end of the wave Gate tube (
Black pipe covering cable)
Cable ties installed in PCS chassis.
Tie the cable through the cable tie.
Fix the end with cable tie and tighten.
Fix the other end of the bellows on the screw connected on the optical stage.
Laser cable and Y-Axis-
R cable reference picture, fix two points with cable tie belt. Fix Y-Axis-
R cable with cable tie belt already installed. Fix X-Axis cable, Y-Axis-
L cable, foot switch cable connected to cable tie belt already installed.
Make sure the cable does not cover the USB port of the PCB housing.
Restrictions on installing XAxis cable (
Ensure the direction of the switch)
Cover the bolt with 2 m2 × 10 hex plugs and connect the connector with a stepping motor. Fix the X-
Cable tie-in shaft cable at the designated place. Fix the X-
Cable tie-in shaft cable at the designated place.
Connector to connect Y-Axis-
R cable with stepping motor.
Restrictions on installing YAxis-L (
Ensure the direction of the switch)
Cover the bolt with 2 m2 × 10 hex plugs and connect the connector with a stepping motor.
Use the limit of two mounting foot switch cables in the head cap bolts of the m2 × 10 hex socket.
Cut off the rest of the cable tie belt.
Click here to see more detailed instructions, including a picture list of the parts box x1DC fan x1Screws screws assembled by PCB housing x8M3 * 10 hex socket head cap bolts x3 (for 1. 6W)
Install DC fan install DC Dan with 3x10 hex socket head cover bolt on PCB housing.
* Use only three of these holes.
Don\'t use another one. (
This is to avoid the screw from touching the radiator of the laser plate. )
Make sure the DC fan is in the right direction.
Connect the DC fan to the control board.
Fix the DC fan cable and PCB cable with cable tie.
Install side cover. Use the PCB-case-
Specify screws.
For the first screw, slightly loose, otherwise it is difficult to fix the screw on the other side.
Make sure the direction is correct.
Install front cover using PCB-case-
The specified screws, the front cover fitted with the DC fan.
PCB housing assembly (for 3. 5W)
Install DC fan with 3x10 hex socket head cover bolt on PCB housing.
Use three points.
Don\'t use another one.
Make sure the DC fan is in the right direction.
Connect the DC fan to the control board.
Fix the DC fan cable and PCB cable with cable tie.
Install side cover. Use the PCB-case-
Specify screws.
For the first screw, slightly loose, otherwise it is difficult to fix the screw on the other side.
Make sure the direction is correct.
Install front cover using PCB-case-
The specified screws, the front cover fitted with the DC fan.
Click here for more detailed instructions including PartsLaser unit x1 optical carrier x1 height adjustment acrylicx1M6 * 8 hex socket head cap bolt x1 cable connector x1
The optical carrier is temporarily fixed in the threaded hole in the center of the laser unit.
While pushing the light carrier down, fix it with m6 × 8 Hex plug cap bolts.
Fixed optical table (
Above mini v plate_C)
Optical Carrier (
At the top of the laser unit).
Connect the laser cable and the laser equipment.
As shown in the figure, connect the laser cable with a cable tie.
Installation is complete.
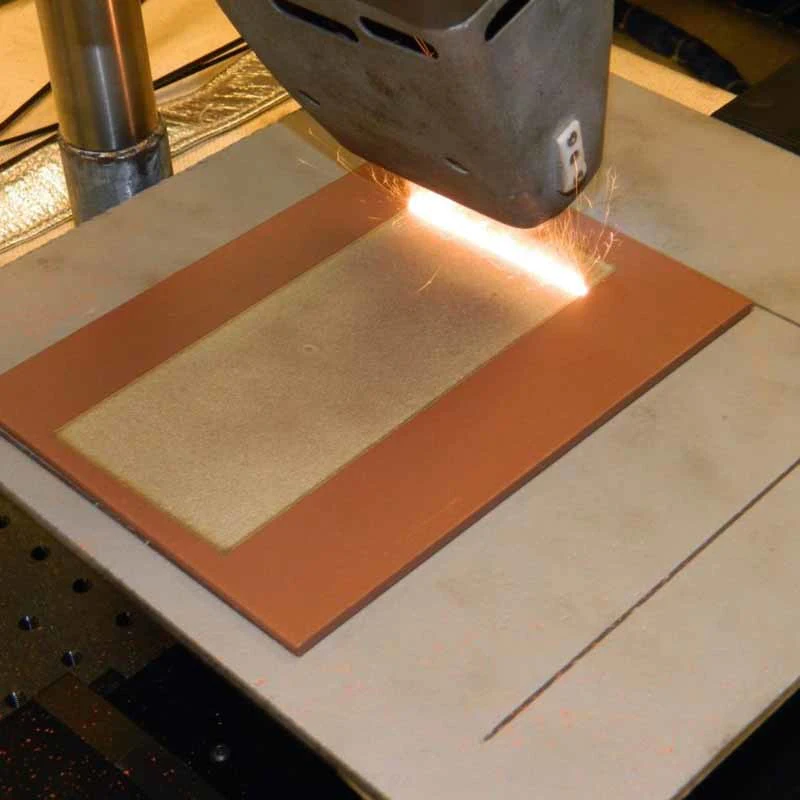
Click here to see more detailed picture instructions * when cutting or engraving using the FABOOL laser Mini, there must be 3mm space between the laser unit and the material you want to cut or carve for focus purposes.
Please adjust the appropriate height according to the thickness of the material.
Use height adjustment acrylic.
* Scratch protection sheet covered above.
Please remove it when using.
How to adjust Height1)
Place the material under the FABOOL laser Mini and place a highly adjustable acrylic resin on the material.
Then, put them under the laser device. 2)
Loosen the dial screw on the side of the user unit and lower the laser unit until the bottom touches the height-adjusted acrylic.
Tighten the dial screws on the side of the optical carrier.
After fixing, be sure to remove the height adjustment acrylic.
Please note that if the dial screws are not tight enough, the optical carrier may be released when cutting and engraving, and the laser unit may fall off.
Ready to cut and carve PartsAC adapter x1AC cable x1USB cable x1 operation check * at this time, laser should not be radiated when plugged in.
If there is radiation, unplug it immediately and stop assembly.
* When you plug in the power, please wear safety glasses and place materials such as wood boards under the laser device to protect the table.
Connect the AC adapter with an AC cable.
Connect the PCB housing with an AC adapter.
Connect the PCB housing using a USB cable.
Connect the other side of the USB cable with the PC.
Connect the AC cable with a socket (AC100V).
Check if the DC fan in the PCB housing is rotating.
Check if the DC fan in the laser unit is rotating.
When using the FABOOL laser Mini, we recommend using a protective cover, but if you do not, please put a plate to protect the base.
We recommend the use of steel plates, stainless steel plates or other flammable materials (
So that the laser radiation does not reflect so much dark color).
Please make sure to use one large enough to cover the entire area used for cutting and engraving.
Click here to learn more about the overview of FABOOL software pictures. In this section, we introduce the functionality, basic specifications, and overall system configuration of FABOOL software.
The main features of software 1.
Work with FABOOL laser Mini and smart laser Mini.
Import data from the drawing software and set cutting and engraving parameters for machining (
Laser Output and moving speed of the head).
There are two ways of cutting and engraving;
One is the \"vector method\" for the laser to move along a straight line, and the other is the \"grating method\" for the laser to move horizontally, just as it fills the area. 2.
Import multiple data and modify the imported data (
Zoom, relocate, etc). 3.
Save and manage processing parameters and import data as \"Project files \".
Here are the FABOOL software user registration and driver installation instructions for FABOOL software. How to Create SVG processing data for imported data using FABOOL software.
Carved on macarons
Carved on macarons and white chocolate.
Engraved logo on iPhone 4.
Engrave the logo on denim5.
Cut the model of the house and put it together.
Made a puzzle with a picture of the child drew7.
Assemble the desktop laser cutting machine and carving knife developed by Japanese engineer smartDIYs.
The machine is excellent in terms of availability and scalability to meet a variety of needs.
It\'s all from the development of a high
A year and a half ago we powered our own 60 w large laser cutter and engraver and we turned it into a smaller version of the desktop laser cutter and engraver, like the smart laser mini
This time, we released the upgraded version of the FABOOL Mini, which has improved its usability, fashion design and 1/4 assembly time.
In June 2016, FABOOL laser Mini earned about $60 million, the highest amount in the history of Japan\'s major crowdfunding platforms and the world\'s second-highest laser cutting campaign.
For more information about our laser cutting machines and carving knives-
FABOOL laser MiniKey features 1.
The \"scalability\" extension section that adapts to the various needs of users allows users to customize according to their own needs. (e. g.
Will cause the frame of 1 m * 1 m processing range to expand and replace it with a laser head that can produce a higher output.
Because both hardware and software are open source, the user\'s original functionality can be added. 2.
Meet a wide range of needs by providing adequate machine performance
Motor driver and high
Fast microcomputer chips, FABOOL laser Mini can be used in a variety of situations from design, teaching to prototyping!
Although the price is affordable, but high
Specifications and quality in Japan
The design of the laser cutting machine will not disappoint the user. 3.
Easy assembly takes only two hours.
All you need is a hex wrench and wrench included in the FABOOL laser mini kit. 4.
User friendly cloud
All free softwarein-
A software is cloud.
Browser-based and working on a browser, including functions such as creating and retrieving processed data for a product
Share all the data and images of the product between other users.
Product Specification Working Area: 300 × 230mm laser: 1.
445nm 6 w laser diode (Basic Model)/ 3. 5W (Power-up Model)
Processing Method: Vector engraving supports Raster engraving of Windows 7 and Windows 8 operating systems.
1. windows 10, Mac OS X, Linux, browser supporting Raspberry Pi: files supported by Chrome and FireFox: USB cable, AC adapter, laser safety glasses, hex wrench, wrench power supply: AC100V ~ 240 V size 540x485x140mm (
Cable not included)
Working temperature: below 30C (86F)
Continuous working hours: about 4 kg weight under 1 hour
Y axis x1 motor mounting plate
X-X shaft x2 timing pulley 3x m3x6 hex socket head cap bolt x12 Assembly
Shaft motor unit motor mounting plate X-
Shaft mounting motor mounting plate x-
Shaft on stepping motor, with m3 × 6 hexagon plug Bolt.
* X direction of motor mounting plate-
Shaft, make sure there are two small holes in the lower right corner.
Install the timing pulse on the spindle of the stepping motor to insert the timing pulley, and then tighten the 2 fixing screws with a hex wrench.
* Make sure the timing pulley is in the right direction.
* Insert the fixing screw into the timing pulley from the beginning.
If it is not possible to insert the timing pulley smoothly, Release 2 groups-
Screw the screw with a hex wrench and try to insert it again.
* Please be careful because they are easy to fall off when the fixing screws are too loose.
Insert the timing pulley completely into the spindle. (
The position adjustment will be done later, so there is no need for precise alignment at this time. )Assembly of X-
Shaft motor unit completed. Assembly of Y-
Shaft motor unit for mounting motor mounting plate Y
Shaft mounting motor mounting plate y-
Insert the shaft into the stepping motor using the m3 × 6 hex screw socket Bolt.
Install timing PulleyAs with x-
Shaft, insert the timing pulley into the spindle of the stepping motor and tighten the screws.
Make sure that the timing pulley is fully inserted into the spindle. (
The position adjustment will be done later, so there is no need for precise alignment at this time. )
Assemble the other in the same program, but make sure the direction of the motor mounting plate y-The axis is correct. Assembly of y-
Shaft motor unit completed.
For more detailed instructions with pictures, click parts list \". Mini v platform _ c x1mini v platform _ l x1mini v platform _ r x1x-
X1V-shaft motor unit
Slot 450mm x1Optical stage x1M5 x1M4 * monthly hex bolt T nut x6M5 * month low head bolt x6Cable tie x2M6 * monthly hex bolt x2Timing belt 106 cm x1Assembly X
Before assembly, we will perform shaft adjustment and inspection on three types of micro v plates.
Please check if all 10 screws are firmly fixed.
If the screws are loose, tighten with a hex wrench and wrench.
Next, adjust the space between the wheels of the three micro v plates.
Use one wheel for adjustment on each Mini v board.
The first is mini v plate_C. Insert the V-
Slot 450mm between Mini v plate_C rollers.
It may be too loose or too tight.
The correct state is \"no significant clicking sound when v-
Straight up slot.
The structure and adjustment of the eccentric wheel (
One on each Mini v Board)
Contains eccentric gasket.
It can be adjusted by turning the eccentric gasket.
The position of the wheel (
Space between wheels)
Adjust by turning the gasket.
Gradually turn the eccentric gasket with a wrench, while sliding the Micro v plate to adjust the looseness and tightness.
Adjust until there is no significant click when v-
Straight up slot.
Once the adjustment of the Micro v board is completed, slide out V-slot 450mm.
Next, adjust the mini v plate_R and mini v plate_L in the same way as above. Use V-
Slot 450mm that you use to adjust.
Once the adjustment of Micro v plate _ r and micro v plate _ l is completed, from v-slot 450mm.
This is the adjustment and inspection of 3 Micro v plates.
Install Mini v platform in V-
Slot 450mm between Mini v plate_C rollers.
Install the mini v platform _ rnext-
Slot 450mm on the table, then install the Mini v platform _ r on the left side of V-
Slot 450mm with M5 T nut and 5x8 bow Bolt.
Put two M5 T nuts in V-
450mm slot from left end.
* The position does not have to be precise at this point.
Install the Micro v platform _ r with two of the M5 × 8 bow bolts, and the M5 T nut is in it.
Position the Mini v platform _ r with \"V-
The slot is perfect for the grooves on the back of the Mini v plate_R.
\"Install Mini v platform _ linstall Mini v platform _ l on the right side of V slot using M5 T nut and 5 × 8 bow Bolt.
In the same way as before, put two M5 T nuts into the V slot from the right side.
Install the Micro v platform _ l with two of the M5 × 8 bow bolts, located in the position where the M5 T nut is located.
In the same way as before, compare the position of mini v plate_R with \"V-
The slot is perfect for the grooves on the back of the Mini v plate_R. ”Installing x-
Installation of x-axis motor unit
The shaft motor unit you assembled in the early part on the Mini v platform l with M5 T nut and 5x8 hex socket head cap bolts.
We will adjust the position of x-
After the shaft motor unit.
Again, place two of the M5 T nuts in the position shown in the following figure and install x-
Shaft motor unit with m5 × 8 bow Bolt.
For the later process, tighten x-
The shaft motor unit on the position where the stepping motor spindle and mini v plate_L just met.
Install the timing belt and install the timing belt. Place x-
In order to easily install the timing belt, prepare the timing belt 106 cm and cable tie the shaft motor unit to the left.
Use the thinnest hex wrench.
Insert the end of the timing belt into the hole on the left side of the mini v plate_C.
Insert the jagged surface of the timing belt up until 2-
It\'s 3 cm in the groove.
Fold the timing belt with a jagged surface.
Fix the timing belt using cable tie belt.
Place the bound part at the bottom.
* If the situation is not good, please cut the tie and try again with the new one. (
There are 10 more ties. )
Once one end of the timing belt is fixed, insert the other end into the hole on the right side of the Mini v platform c around x-
Shaft motor unit and timing pulley on the other side.
* Please make sure the timing belt is not twisted.
In the same way as before, fix the timing belt using cable tie belt.
* The rough length of the timing belt to leave is 2-3cm.
We\'ll adjust it later so you don\'t have to be too precise.
Cut off the rest of the two ties.
At this point it is OK to keep the timing belt a little loose.
Please make sure the timing pulley is on the x-
Axis motor is aligned with the track slot on V-slot.
If there is a gap, Please loosen the fixing screw on the timing pulley, adjust the position and tighten the screw again.
Next, release the fixed \"x-\" in order to extend the timing belt-
Shaft motor unit \", pull the timing belt and tighten the screw again.
Please make sure the motor and V-
Adjust the timing belt parallel slot.
Install the optical stage and install the optical stage on mini v plate_C with 6 × 8 Hex plug cap bolts.
Screws m4 × 6 hex socket head cap bolts and x-at the top of the optical stage-
Complete shaft assembly.
For more detailed instructions on the picture, click hereList-for PartsX-axis unit x1V-slot 410mm x4Y-
Shaft motor x2 idler wheel plate x2 timing belt 100 cm x2 m5 T nut x18Bracket x 4M5*8 bow Bolt x16 Cable tie-in x4 Y-assembly
Axis assembly of the frame-three sides of the Assembly frame
Slot 410mm, bracket, M5 T nut x4 and M5 * 8 bow Bolt x4.
On a flat table, put three V-slot 410mm.
Put one M5 T nut in each of the four holes around the corner.
Place the bracket on the two corners where you place the M5 T nut and temporarily fix it with a 5x8 Bolt. Stand up the V-
Slot and make sure it is at right angle.
Then remove the gap between V-
Push the slot with your hand and tighten the 5x8 bow Bolt.
Repeat the same procedure on the other side to complete the assembly of the frame.
* Please make sure the m5 × 8 bow Bolt is tightened so that the frame does not deform when lifting.
Place the frame on the table and slide \"x-
Axis unit \", you are in V-slot frame. (Insert the V-
There is a slot between the rollers. )
Next, assemble the last side of the frame using the following parts.
First, insert two M5 T nuts in the hole outside. (
We will use these in future components to install the board housing. )
Second, as with the front, insert four M5 T nuts in each hole and put them into the frame.
Place the bracket on two corners and place the M5 T nut.
* Please make sure the m5 × 8 bow Bolt is tightened so that the frame does not deform when lifting.
* Adjust when placing all four sides of the frame on the table, making it easier to maintain the frame horizontally and at right angles. Checking Y-
Axis => adjust V-
Check the movement of y-With the hand shaft.
The correct state is x-
When the frame stands up, slide under the axial direction. *Move x-
Axis as much as possible.
If you feel slightly stuck, loosen the eccentric gasket of the Mini v platform r and the Mini v platform l. (
Watch the video below)
From the side of the wheel you can easily see the wheel and V-
Groove of the slot, so it is easier to adjust.
X-loose
The shaft unit does not affect the operation. Installing Y-
Shaft motor unit/Idler wheel platform placement x-
Shaft motor closer to you
Install shaft motor unit on the left \"and idler wheel board on the right.
Insert two M5 T nuts from the right side and mount the idler wheel plate with a 5 × 8 bow Bolt.
We will make final adjustments later in the conference.
Next, insert two M5 T nuts from the left side and install \"y-
Shaft motor unit with m5 × 8 \".
Make adjustments to align the \"black line\" of \"y\"
Shaft motor unit at the edge of the aluminum frame \".
There is another \"black line\" inside, so make sure V-
The slot fits perfectly.
Make sure the timing pulley position matches the groove of V-slot.
If it is not aligned, loosen the fixing screw for the timing pulley, adjust the position, and tighten the fixing screw again.
The leg installation on this side is complete.
Repeat the same process and install a leg on the other side.
Make sure the timing pulley position matches the groove of V-slot.
If it is not aligned, loosen the fixing screw for the timing pulley, adjust the position, and tighten the fixing screw again.
The second round of installation is now completed.
Install you in the previous section for x-
Shaft, install timing belt using cable tie belt. (
In the picture, we put \"x-
Shaft motor unit closer to us. )
Insert the timing belt from the top and insert the jagged surface inside.
Tighten the cable tie in the direction shown in the figure.
Once one side of the timing belt is fixed, turn the timing pulley and fix the other side with a cable tie.
When fixed with cable tie, try to tighten the belt. (
Please note that there is a limit on the tightness of the belt, allowing normal operation, so you don\'t need to pull too tight.
We will adjust the tightness later. )
The timing belt should be a bit loose at this time.
To tighten the belt, loosen the screw on the side of the idler wheel and tighten the screw again while pulling the belt in the direction shown in the figure.
You finish this side when the timing belt is tight.
Again, on the other side, after the timing belt is installed, pull the idler wheel to tighten the belt.
You\'re done with this.
Click here for more details, including a list of pictures of PartsPCB case x1Laser board (1. 6W/3. 5W)
X1Control board x1M5 * 6 bow Bolt x 2 M3 * 4 hex socket head cap bolt x9assier x8 Cable tie-in to capture x1 board installation * instructions on 3,
5 installation of laser board (For 1. 6W)
Insert the gasket between the gasket already attached to the PCB housing and the laser plate and tighten it with the m3 × 4 hex plug cover Bolt (four points).
Install the PCB housing on the body and place the PCB housing on V-
Slot 410mm on the back of the fuselage.
Fix it using two of the M5 t nut and two of the 5 × 6 bow bolts (
Inserted when assembling frame).
Aim at the center of the installation location.
Install the gasket between the control board and the m3 × 4 hex plug Bolt and tighten it (four points).
Adjust the tilt of the radiator to install the DC fan and tilt the 5mm two radiators on the laser board.
If it tilts too much, it touches the side cover.
Make sure it does not touch the side cover.
5mm is the state of horizontal from the plate and radiator.
Clip the cable tie belt behind the red circle and fix the cable tie belt with a hex plug cover Bolt.
Installation of plates (3. 5W)
If you use 1.
6 w model, please skip this part.
Insert the gasket between the gasket already attached to the PCB housing and the laser plate and tighten it with the m3 × 4 hex plug cover Bolt (four points).
Install the PCB housing on the body and place the PCB housing on V-
Slot 410mm on the back of the fuselage.
Fix it using two of the m5 × 6 bow bolts (
Inserted when assembling frame).
Aim at the center of the installation location.
Install a washer between the control board and the m3 × 4 hex plug Bolt and tighten it (four points).
Put a cable tie at the back of the Red Circle (see picture)
, Fixed cable tie with Hex plug cover Bolt.
See the picture for the direction of the capture.
Click here for more details, including a list of pictures of PartsPCB chassis x1Laser cable x1X-axis-R cable x1X-axis cable x1Y-axis-
L laser board x1Foot switch cable x1Cable cable with x2 wiring (for 1. 6W)
※Description of 3.
5 w, please check below the page.
We will do the wiring of 6 cables. 1. PCB cable2. Laser Cable3. X-axis cable4. Y-axis-R cable5. Y-axis-L cable6.
Foot switch cable wiring inside the PCB chassis we will collect cables with two cable ties. Wiring for 1. 6W is done.
* The picture shown here is 1.
Monthly WWiring laser board (for 3. 5 W)
Wiring six steps 1. PCB cable2. Laser cable3. X-axis cable4. Y-axis-R cable5. Y-axis-L cable6.
Foot switches inside the PCB chassis collect cables we will collect cables with two cable ties. Wiring for 3. 5W is done.
Click here to learn more about the PartsM3 post picture list
Assembly nut x 2 M3 * 6 hex socket head cap bolt x2 cable tie belt capture x2 cable tie belt x8 fixed cable tie belt capture the body of FABOOL laser Mini.
The side facing you will be the base.
After sliding M3
Assemble the nut into a V-slotslot.
Put it completely in the groove.
Fix the cable tie buckle with m3 × 6 hex plug Bolt.
Determine its orientation.
Fix the opposite side in the same direction.
After sliding M3
Assemble the nut into a V-slotslot.
Fix the cable tie buckle with m3 × 6 hex plug Bolt.
Determine its orientation.
Fix the opposite side in the same direction.
The wiring of the laser cable fixes one end of the wave Gate tube (
Black pipe covering cable)
Cable ties installed in PCS chassis.
Tie the cable through the cable tie.
Fix the end with cable tie and tighten.
Fix the other end of the bellows on the screw connected on the optical stage.
Laser cable and Y-Axis-
R cable reference picture, fix two points with cable tie belt. Fix Y-Axis-
R cable with cable tie belt already installed. Fix X-Axis cable, Y-Axis-
L cable, foot switch cable connected to cable tie belt already installed.
Make sure the cable does not cover the USB port of the PCB housing.
Restrictions on installing XAxis cable (
Ensure the direction of the switch)
Cover the bolt with 2 m2 × 10 hex plugs and connect the connector with a stepping motor. Fix the X-
Cable tie-in shaft cable at the designated place. Fix the X-
Cable tie-in shaft cable at the designated place.
Connector to connect Y-Axis-
R cable with stepping motor.
Restrictions on installing YAxis-L (
Ensure the direction of the switch)
Cover the bolt with 2 m2 × 10 hex plugs and connect the connector with a stepping motor.
Use the limit of two mounting foot switch cables in the head cap bolts of the m2 × 10 hex socket.
Cut off the rest of the cable tie belt.
Click here to see more detailed instructions, including a picture list of the parts box x1DC fan x1Screws screws assembled by PCB housing x8M3 * 10 hex socket head cap bolts x3 (for 1. 6W)
Install DC fan install DC Dan with 3x10 hex socket head cover bolt on PCB housing.
* Use only three of these holes.
Don\'t use another one. (
This is to avoid the screw from touching the radiator of the laser plate. )
Make sure the DC fan is in the right direction.
Connect the DC fan to the control board.
Fix the DC fan cable and PCB cable with cable tie.
Install side cover. Use the PCB-case-
Specify screws.
For the first screw, slightly loose, otherwise it is difficult to fix the screw on the other side.
Make sure the direction is correct.
Install front cover using PCB-case-
The specified screws, the front cover fitted with the DC fan.
PCB housing assembly (for 3. 5W)
Install DC fan with 3x10 hex socket head cover bolt on PCB housing.
Use three points.
Don\'t use another one.
Make sure the DC fan is in the right direction.
Connect the DC fan to the control board.
Fix the DC fan cable and PCB cable with cable tie.
Install side cover. Use the PCB-case-
Specify screws.
For the first screw, slightly loose, otherwise it is difficult to fix the screw on the other side.
Make sure the direction is correct.
Install front cover using PCB-case-
The specified screws, the front cover fitted with the DC fan.
Click here for more detailed instructions including PartsLaser unit x1 optical carrier x1 height adjustment acrylicx1M6 * 8 hex socket head cap bolt x1 cable connector x1
The optical carrier is temporarily fixed in the threaded hole in the center of the laser unit.
While pushing the light carrier down, fix it with m6 × 8 Hex plug cap bolts.
Fixed optical table (
Above mini v plate_C)
Optical Carrier (
At the top of the laser unit).
Connect the laser cable and the laser equipment.
As shown in the figure, connect the laser cable with a cable tie.
Installation is complete.
Click here to see more detailed picture instructions * when cutting or engraving using the FABOOL laser Mini, there must be 3mm space between the laser unit and the material you want to cut or carve for focus purposes.
Please adjust the appropriate height according to the thickness of the material.
Use height adjustment acrylic.
* Scratch protection sheet covered above.
Please remove it when using.
How to adjust Height1)
Place the material under the FABOOL laser Mini and place a highly adjustable acrylic resin on the material.
Then, put them under the laser device. 2)
Loosen the dial screw on the side of the user unit and lower the laser unit until the bottom touches the height-adjusted acrylic.
Tighten the dial screws on the side of the optical carrier.
After fixing, be sure to remove the height adjustment acrylic.
Please note that if the dial screws are not tight enough, the optical carrier may be released when cutting and engraving, and the laser unit may fall off.
Ready to cut and carve PartsAC adapter x1AC cable x1USB cable x1 operation check * at this time, laser should not be radiated when plugged in.
If there is radiation, unplug it immediately and stop assembly.
* When you plug in the power, please wear safety glasses and place materials such as wood boards under the laser device to protect the table.
Connect the AC adapter with an AC cable.
Connect the PCB housing with an AC adapter.
Connect the PCB housing using a USB cable.
Connect the other side of the USB cable with the PC.
Connect the AC cable with a socket (AC100V).
Check if the DC fan in the PCB housing is rotating.
Check if the DC fan in the laser unit is rotating.
When using the FABOOL laser Mini, we recommend using a protective cover, but if you do not, please put a plate to protect the base.
We recommend the use of steel plates, stainless steel plates or other flammable materials (
So that the laser radiation does not reflect so much dark color).
Please make sure to use one large enough to cover the entire area used for cutting and engraving.
Click here to learn more about the overview of FABOOL software pictures. In this section, we introduce the functionality, basic specifications, and overall system configuration of FABOOL software.
The main features of software 1.
Work with FABOOL laser Mini and smart laser Mini.
Import data from the drawing software and set cutting and engraving parameters for machining (
Laser Output and moving speed of the head).
There are two ways of cutting and engraving;
One is the \"vector method\" for the laser to move along a straight line, and the other is the \"grating method\" for the laser to move horizontally, just as it fills the area. 2.
Import multiple data and modify the imported data (
Zoom, relocate, etc). 3.
Save and manage processing parameters and import data as \"Project files \".
Here are the FABOOL software user registration and driver installation instructions for FABOOL software. How to Create SVG processing data for imported data using FABOOL software.
Carved on macarons
Carved on macarons and white chocolate.
Engraved logo on iPhone 4.
Engrave the logo on denim5.
Cut the model of the house and put it together.
Made a puzzle with a picture of the child drew7.
Custom message
Related Products